Showing posts with label tissue paper. Show all posts

Thursday, 16 July 2026

Wanderlust 2026 - weeks fourteen to twenty-six - Paper Alchemy (part two)

Here are the other pages I particularly enjoyed making from the Paper Alchemy theme of the art journaling course.  Above is a collage of printed vellum, magazine transfers onto sticky tape, material, and photos. It was all about our past. 
We made 'paper leather' for this lesson, using packaging paper and coating it with a mixture of acrylic paint and glue. For some pieces, we added oil and scrunched it up and flattened it out many times which gave it a very 'leathery' feeling.  We also encased thread and sequins in tissue paper, which was rather messy, but fun!
As I make cards, making these cards was right up my street.  Abstract painting, painting an animal (our much missed cat, Scruffy) and then painting the background for one and finally using packaging to make a collage card.  
I used a matcha chocolate wrapper.
Watercolour flowers with added tissue paper foliage and gold accents worked really well.  Painting in the background made the flowers pop.
I did another version in watered down acrylics which worked well, but seems to have lost a bit of expression/spontaneity along the way.  I still like it though!
Making bunting using paper and material was a really enjoyable week.  I chose to make a single piece so that it could go in my journal. Alcohol inks on the gel plate made some lovely papers.
Finally for this theme was looking at the Japanese art of Kintsugi - taking something (usually a ceramic) which has got broken and then mending it, highlighting the cracks with gold.  Crackle paste came out to play here.  The photo in the centre is of Tupholme Abbey.
The crackle paste worked really well.  Our next theme is 'Stories Unfolded' - I think this may be another good one for me!

Sunday, 12 July 2026

Wanderlust 2026 - weeks fourteen to twenty-six - Paper Alchemy (part one)

 I was really looking forward to the Paper Alchemy theme for the art journaling course, as I really enjoy working with paper and was eager to see what we would be creating.  It didn't disappoint as these were some of my favourite weeks so far.

Making journals has featured several times in this theme and this journal has pages made using calico, cotton and tracing paper.  The pages sometimes have various layers on them, including gesso mixed with plaster of paris and texture paste, as well as collage.
We worked on the pages, poking through them with an awl and burning through them (this shows one of the tracing paper pages on the right).
We also put items behind the pages and then sanded off the gesso/plaster of paris mix, leaving the image - in this case, paperclips.  The journal is small and introduced me to lots of different techniques, including the binding, where the pages are sewn together, the covers placed over the top and the pages are folded back and glued over the spine. I loved making this!
Another journal made using a masterboard.  The black squiggles represent ancient writing and we had to run the page under a tap before the writing was dry so that the writing was faded and blurred, which worried me initially but which worked well, as the paper had been layered with collage and acrylic paint first and been left to dry.
Collage decorations were added to the pages.
The words on this page were taken from the scrap of book page I used and they jumped out at me.  I love serendipity!
Collaging a scene was enjoyable too, and we added details to our collaged paper. I have a large collection of painted pages, so it was good to be able to use a few of them.
Another journal, but as my main art journal was getting rather bulky, I decided to recreate smaller pages on the page.  (I have since decided to make the extra journal but not add it to my main journal, so this may feature in another post).
Top left is a pop-out/exploding/flower page with stamped art words. 
Behind the starry door is a stamped eye.
The collaged book page door reveals a fold out.
Finally, a gel plate printed door reveals a spinner (with some of my favourite bought tissue paper on the left, echoing some of the colours).
More to come in part two. 

Sunday, 6 July 2025

Wanderlust 2025 - part two

I've completed the second part of the online art journaling course that is Wanderlust and the themes this time were Personality, Feelings, Senses.  I have picked my favourite pages or the pages I most enjoyed making to show you.  Above is a linocut printed face from my imagination (we could choose our own face, but I decided that wasn't something I wanted to include) together with some resist watercolour patterns, some stamping and some stitching.  I really liked the stitching and have used it in other pages.  I also would like to use it in some other mixed media pieces which are going round my head at the moment.
For this one, the teacher was focusing on the colours of lakes and streams, but as it was allium time in the garden, I focused on the colours I could see there.  The watercolour circles with different techniques - wet on wet, wet on dry etc. are strung together and make a hanging decoration, should you want to do that.
I enjoyed using the bright colours in this page which was fun to make.
You'll see more of the stitching here. The background technique was messy but really fun as it was all about adding different media to tissue paper, including gesso, watercolour, acrylic ink, colour burst/pixie powder/infusions (water soluble dye powders some with added mica or walnut ink), alcohol ink. They were left to dry and then scrunched up, smoothed out then wrinkled as pieces were glued down to provide some texture.  It was very freeing.  The pocket on the left includes a tag covered with the tissue paper really smoothed out and a colour swatch piece that was hanging about.
This page was made in the teacher's style (Dyan Reaveley).  Bold colours, big shapes.  It is quite a textured page as the strips on the trees are collaged on, the trunks are embossed, the flower centre is sticking up and has a button in the middle, and the blue heart is card embossed with ultra high embossing powder (several times) and then stamped into while still warm.  The two hearts in the trees are covered with 'Glossy Accents' which is a product that dries to a resin-like finish.
Finally, here is a portrait of someone.  In the lesson, she was described as a 'forager'.  We had to make leaves from gel printed tissue paper or tracing paper, or copy paper.  Before I collaged the leaves on, I showed Chris the watercoloured face and he said she had a look of a 'Svetlana', someone from Eastern Europe.  The face is created using layers of watercolour in a single shade, then a bit of coloured pencil. I turned 'Svetlana' into a forest goddess, with her leaf costume.  
I wonder what the next twelve weeks will bring.

Friday, 9 June 2023

Decorating a tray

Due to the lack of clear surfaces in our sitting room (mainly due to my various craft stashes which seem to be taking over!), I often use the ironing board as a makeshift table. This is fine until someone wants to use it for its intended purpose.  I decided to try and make things a bit easier to move off the ironing board and so bought a plain tray to keep my stuff in.  Well, it wasn't going to be plain for long.  I had recently seen a video by Shemi Dixon on Youtube here where she painted a tray.  I was going to do that, but then as my art journal course had featured mark making using acrylic paint pens on tissue paper, I decided to do that instead.  
I had a happy time making all the marks then painted the tray with a couple of coats of acrylic paint, tore up the tissue paper and stuck it down.  I finished with a couple of coats of varnish and some gold gilding paste on the top and corners.  I am really pleased with the finished tray and it is very much my own design.

Thursday, 23 February 2023

Artful August Challenge - in January! Week Four to end

Here is the final week (and a bit) from the daily challenge I did in January.  'Person' was a gel plate printed background, then masked shapes and Payne's Grey acrylic paint with white dots. This is a technique I have done before, but it's a good one.
For 'Shape', I knew I wanted to cut a shape into the page, so with a bit of advice from Chris, I did this.   I die cut shapes from painty papers and  made this colourful page.  You can glimpse a future page through the rectangle window.
'Type' was made using some interesting font stamps from my stash and a typewriter stamp from Visible image.  
I used some of my own stamped 'Tissue' paper as the background and added shapes in translucent paint.
'Botanical' was inspired by a page from a flower book which I made into the pocket.  
Inside the pocket I added a card.
I used stamps and embossing powder to demonstrate 'Resist'.  
I went with a vintage feel for 'Travel', just using stamps and ink. 
I enjoy creating 'Drip' and it's something that I use in my art journaling too.  This one used sparkle watercolour inks.
Two of my favourite books made up the background for 'Book' - 'Persuasion' and 'The Secret Garden'.
'Vintage' meant I could look through my many digikits and find some suitable images.  I added an embossed frame and a snippet of material with a button.
The back of the journal was covered with an alcohol ink gel print.
The front was stamped and had a die cut title added.
Finally, the inside cover was stamped and the prompts list was added.
This was such an enjoyable project to do during January and I may well look out for it again this August, for January 2024!
 

Sunday, 30 January 2022

Creating collage papers and more stamps

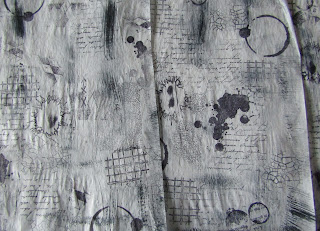
Recently, I was looking at some printed rice papers for collage and was tempted to make a purchase, when I had a revelation. I had tissue paper, acrylic paint, stamps and ink, so why on earth didn't I create my own papers?  I had a happy hour or so creating these, using just black and white acrylic paint, which I dry brushed onto the tissue paper.  I found I had a lot of stamps (no surprise there!) which would work really well to give that grungy look I liked.  These included circle shapes, patterns, text, splodges and splats. 
So, I now have four papers to rip up and use in collage projects and they didn't cost me anything (except for the original supplies, which I already had).  I foresee more variations on a theme to come...
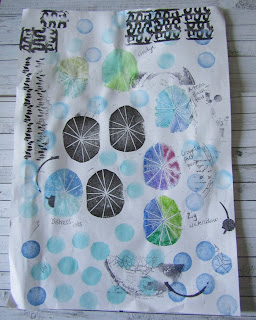
I have also been carving my own stamps again, from pencil erasers.  The black images are the most recent ones I have made and I used this 'mop up' sheet to practise applying different watercolour pens and pencils to the stamp to get a multicoloured image too.  I found that the distress inks or Zig watercolour pens gave me the best results.  I think I may well be making more stamps like this over this year.